Winterizing a Pop Up Camper
As the nights grow longer, the days go shorter, and the temperature plummets, most campers will hit a tipping point where they simply put their rigs away until the weather turns. There’s still plenty to do outdoors during the colder fall and winter months, but cold weather camping isn’t for everyone, and so most of us end up facing the question of how to winterize our rigs at some point.
Of course, there are certain winterization tasks that even cold weather campers need to perform in between outings. The most important part of winterizing any RV is removing all the water from the fresh water tank, pump, supply lines, and other associated components, and that has to be done every time you get home if you use your rig during the colder winter months. At that point it becomes less of a one-time-a-year task and just part of the price you have to pay for camping during the winter.
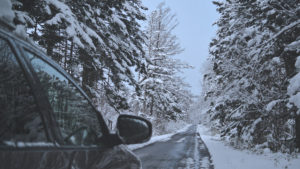
There’s still plenty to see and do in the winter, but do you really want to winterize your pop up camper more than once? Image courtesy of MIKI Yoshihito, via Flickr (Creative Commons 2.0)
Pop Up Camper Winterizing Checklist
Whether you’re putting your pop up away for the duration, or you plan on taking it out here and there when time and weather permit, it’s important to protect the rig from the ravages of freezing temperatures and the elements. The basic steps include:
- Drain the holding tanks
- Clear the water lines
- Add antifreeze (not automotive antifreeze)
- Clean the rig inside and out
- Remove anything that could freeze or grow mold and mildew
- Cover the camper
- Store the unit, if possible, where it isn’t exposed to the elements
The Dangers of Freezing Water
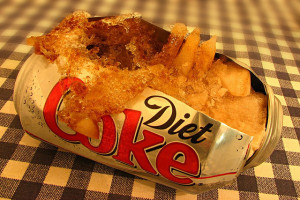
When water freezes, it expands, and what happened to this can of coke could easily happen to your water heater or fresh water tank.
When water freezes, it expands, and when it freezes in a sealed volume, that expansion can cause tremendous amounts of damage. When considering the potential fallout from water freezing inside your pop up camper, there are a number of systems that you should be concerned about. In order from least to most expensive to replace, they are:
- Faucets
- Water lines
- Filter canisters
- Water pumps
- Toilets
- Water heaters
If any water is left in those components, and you experience a hard freeze in your area, then you’ll find yourself facing a hefty bill come spring. You can avoid the possibility of freezing if you have enough room to store your pop up in a heated garage, but not everyone has that option. Even if you do have that option, you may still want to consider winterizing your pop up since you may be one power failure away from an unheated garage and severe damage to your rig.
Dump Your Tanks
Before you do anything else, you’ll want to start off by dumping your waste water tank or tanks. Since a thorough dumping procedure involves running water from your fresh water holding tank into your gray and/or black tanks, you’ll want to perform this task before you drain the fresh water.
Gravity Draining a Pop Up Camper
Many pop up campers that have any kind of water holding tanks include a gravity drain, which often consists of two valves located somewhere on the floor or underside of the unit in the supply and return water lines. When you pull these t-handle valves and open your sink faucet. Opening the faucet breaks the vacuum of the system, which allows water to drain out via gravity feed, onto the ground underneath your pop up.
Although utilizing a gravity drain is often “good enough,” relying on gravity means that any water line lower than the drain point will retain water, and you may also retain water in your filter canister or hot water tank.
Winterizing With Compressed Air
If you have access to an air compressor, you will find that blowing air into your pop up camper’s water lines will typically remove water from any hidden low points. The exact process differs a little depending on the features your pop up has.
- Pop ups with no hot water
- Drain the fresh water tank
- Remove the water supply line from the water pump
- Open your sink faucet
- Blow compressed air into the inlet side of your water pump
- Reconnect the water pump to the water tank
- Blow air into the sink drain
- Pop ups with a hot water package
- Drain the fresh water tank
- Bypass the hot water tank
- Open the pressure relief valve on the hot water tank
- Remove the hot water drain plug or open the drain petcock
- Reinstall the plug or close the petcock after the hot water tank has drained
- Remove the water filter from the water filter canister and reinstall empty canister (if equipped)
- Remove the water supply line from the water pump
- Open the cold water faucet
- Blow air into the inlet of your water pump
- Close the cold water faucet and open the hot water faucet
- Blow air into the inlet of your water pump
- Repeat this process with your exterior shower (if equipped)
- Blow air into the sink drain
- Remove the water filter canister and empty (if equipped)
- Reinstall empty canister (if equipped)
- Pop ups with an interior shower and/or cassette toilet
- Open the exterior access door for the toilet
- Pull out the fill tube and remove the cap
- Rotate the tube until it is able to drain freely
- Replace the cap and store the fill tube after it has drained
- Rotate the indicator tube and allow it to drain
- Replace the indicator tube and close the exterior access door
Winterizing With Antifreeze
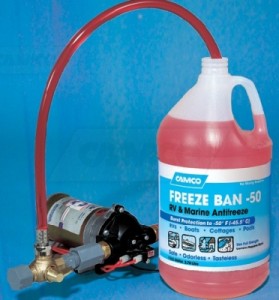
RV/marine antifreeze is typically pink and nontoxic.
Winterizing a pop up camper with compressed air is relatively quick and easy if you have an air compressor, and it usually gets the job done just fine. However, winterizing with antifreeze takes things a step further. If you expect a hard freeze, and you want to avoid any chance of damage to your pop up, then you’ll want to use this method. However, it’s important to note that by antifreeze, we don’t mean automotive antifreeze. The stuff you need is available from camping supply stores, is typically pink in color, and is nontoxic, unlike highly poisonous automotive antifreeze.
- Pop ups with no hot water
- Drain the fresh water tank
- Remove the water supply line from the water pump
- Attach a roughly two foot hose to the inlet of your water pump
- Insert the free end of the hose into a jug of RV water system antifreeze
- Turn on the water pump and open your sink faucet
- Turn the faucet off when the pink antifreeze begins to come out of it
- Remove the sink drain plug and allow antifreeze to drain into the p-trap
- Reattach the fresh water tank to the water pump
- Pop ups with a hot water package
- Drain the fresh water tank
- Bypass the hot water tank
- Open the pressure relief valve on the hot water tank
- Remove the hot water drain plug or open the drain petcock
- Reinstall the plug or close the petcock after the hot water tank has drained
- Remove the water filter from the water filter canister and reinstall empty canister (if equipped)
- Remove the water supply line from the water pump
- Attach a roughly two foot hose to the inlet of your water pump
- Insert the free end of the hose into a jug of RV water system antifreeze
- Open the cold water faucet and turn on the pump
- Close the faucet once pink antifreeze comes out of it and open the hot water faucet.
- Repeat the same process for the cold and hot water on your exterior shower (if equipped)
- Turn off the water pump and relieve any built up pressure by opening either faucet.
- Allow antifreeze to drain into the sink p-trap
- Reconnect the water pump to the fresh water tank
- Remove the empty water filter canister (if equipped) and pour out water and antifreeze before replacing.
The Importance of Winterizing Your Pop Up
Although winterizing your pop up is a relatively involved procedure, it has to be done any time you expect freezing weather. A one time dip below freezing that lasts a few hours typically won’t cause a problem, but a hard freeze almost certainly will, regardless of whether you plan on using the camper again the following weekend or were going to leave it in storage until the spring or summer. Replacing a burst hot water tank can cost upwards of $600, and water pumps are often several hundred dollars as well, in addition to the labor costs of having components like these installed.
Other parts of winterizing, such as removing anything that might grow mold or mildew, and installing a pop up camper cover or storing your rig under cover, are also important for the longevity of the unit. However, the damage that can occur from leaving your rig out in the elements, uncovered or improperly folded up, happen slowly over time, while neglecting to clear your water system can result in a huge financial hit the next time you want to go camping.
